iOS 6 맥 라이언부터 들어갔다

같은 api를 이용한다
Visual Format Language
Standard Space
[button]-[textField]

Width Constraint
[button(>=50)]

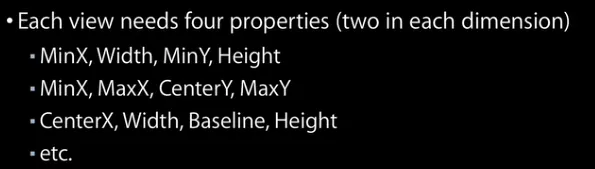
Connection to Superview
|-50-[purpleBox]-50-|
Vertical Layout
V:[topField]-10-[bottomField]

Flush Views
[maroonView][blueView]

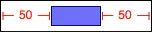
Priority
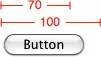
[button(100@20)]
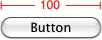
Equal Widths
[button1(==button2)]
Multiple Predicates
[flexibleButton(>=70,<=100)]
A Complete Line of Layout
|-[find]-[findNext]-[findField(>=20)]-|

[NSLayoutConstraint
constraintsWithVisualFormat:@"V:[superview]-(<=1)-[subview]"]
options:NSLayoutFormatAlignAllCenterX
metrics:nil
views:views];
NSLayoutConstraint *c2 = constraintWithItem:firstView
attribute:NSLayoutAttributeLeading
relatedBy:NSLayoutRelationEqual
toItem:secondView
attribute:NSLayoutAttributeLeading
multiplier:1
constant:0];
Swift
복사
디버깅 이야기 나온김에 디버깅 설명
아까 이야기한 조건이 만족되지 않으면, 충돌이 발생합니다.
세가지가 있습니다. 모호한 레이아웃, 논리적 오류, 불만족한 레이아웃
인터페이스 빌더에선 디자인 타임때 충돌을 감지하고 빨간색으로 표시해줍니다.
•
주의할점은 현재 캔버스 크기에서의 충돌을 감지
•
다양한 동적윻ㅇ 크기 방향 언어에 대한 런타임 테스트를 진행해야합니다.
런타임에 레이아웃 오류를 찾으면
충돌하는 제약조건들을 찾고
제약조건중 하나를 깨고 레이아웃을 확인합니다
이를 반복하여 문제가 생기지 않을때까지 제약조건을 계속해서 브레이크 시킵니다.
그리고 이 내용은 콘솔에 노출해줍니다.
대부분의 경우 예쌍한대로 정확하게 나타나게 되지만 뷰계층 구조 전체가 잘못되거나 완전히 사라질수 있습니다.
제약조건을 깨는 방식과 결과물은 레이아웃마다 또는 빌드마다 크게 다를 수 있습니다.
그러기에 콘솔에 오류가 발생하면 무조건 수정을 해야합니다.
UIViewAlertForUnsatisfiableConstraints 브레이크 포인트를 걸면 됩니다.
해결법
translatesAutoresizingMaskIntoConstraints 속성이 YES로 설정되어 있습니다. Interface Builder는 캔버스의 뷰에 대한 제약을 그리기 시작할 때이 속성을 자동으로 NO로 설정합니다. 그러나 프로그래밍 방식으로 뷰를 만들고 레이아웃 할 때는 고유 한 사용자 지정 제약 조건을 추가하기 전에 속성을 NO로 설정해야합니다.
그러나 국제화와 동적 유형 모두보기의 콘텐츠가 예상보다 훨씬 커질 수 있습니다. 가능한 순열의 수가 증가함에 따라 레이아웃이 모든 상황에서 작동하는지 보장하기가 점점 더 어려워집니다.
레이아웃에는 모든 뷰의 위치와 위치를 고유하게 지정하기위한 추가 제약 조건이 필요합니다.
모호한 뷰를 확인한 후 제약 조건을 추가하여 뷰의 위치와 크기를 모두 고유하게 지정합니다.
레이아웃에 동일한 우선 순위를 가진 충돌하는 선택적 제약이 있으며 시스템은 어떤 제약을 깨야하는지 알지 못합니다.
여기서는 더 이상 동일하지 않도록 우선 순위를 변경하여 어떤 제약 조건을 깨야하는지 시스템에 알려야합니다. 시스템은 우선 순위가 가장 낮은 제약 조건을 먼저 위반합니다.
hasAmbiguousLayout. iOS 및 OS X에서 모두 사용할 수 있습니다. 위치가 잘못된보기에서이 메서드를 호출합니다. 뷰의 프레임이 모호하면 YES를 반환합니다. 그렇지 않으면 NO를 반환합니다.
exerciseAmbiguityInLayout. iOS 및 OS X에서 모두 사용할 수 있습니다. 레이아웃이 모호한보기에서이 메서드를 호출합니다. 그러면 가능한 유효한 솔루션간에 시스템이 전환됩니다.
constraintsAffectingLayoutForAxis :. iOS에서 사용할 수 있습니다. 뷰에서이 메서드를 호출합니다. 지정된 축을 따라 해당 뷰에 영향을주는 모든 제약 조건의 배열을 반환합니다.
constraintsAffectingLayoutForOrientation :. OS X에서 사용할 수 있습니다.보기에서이 메서드를 호출합니다. 지정된 방향을 따라 해당 뷰에 영향을주는 모든 제약 조건의 배열을 반환합니다.
_autolayoutTrace. iOS에서 비공개 방법으로 사용할 수 있습니다. 뷰에서이 메서드를 호출합니다. 해당 뷰를 포함하는 전체 뷰 계층 구조에 대한 진단 정보가 포함 된 문자열을 반환합니다. 모호한 뷰에는 레이블이 지정되며 translatesAutoresizingMaskIntoConstraints가 YES로 설정된 뷰도 마찬가지입니다.
콘솔에서 이러한 명령을 실행할 때 Objective-C 구문을 사용해야 할 수 있습니다. 예를 들어 중단 점이 실행을 중단 한 후 콘솔 창에 call [self.myView exerciseAmbiguityInLayout]을 입력하여 myView 개체에 대한 exerciseAmbiguityInLayout 메서드를 호출하십시오. 마찬가지로 po [self.myView autolayoutTrace]를 입력하여 myView를 포함하는 뷰 계층에 대한 진단 정보를 인쇄합니다.
2015-08-26 14:27:54.790 Auto Layout Cookbook[10040:1906606] Unable to simultaneously satisfy constraints.
Probably at least one of the constraints in the following list is one you don't want. Try this: (1) look at each constraint and try to figure out which you don't expect; (2) find the code that added the unwanted constraint or constraints and fix it. (Note: If you're seeing NSAutoresizingMaskLayoutConstraints that you don't understand, refer to the documentation for the UIView property translatesAutoresizingMaskIntoConstraints)
(
"<NSLayoutConstraint:0x7a87b000 H:[UILabel:0x7a8724b0'Name'(>=400)]>",
"<NSLayoutConstraint:0x7a895e30 UILabel:0x7a8724b0'Name'.leading == UIView:0x7a887ee0.leadingMargin>",
"<NSLayoutConstraint:0x7a886d20 H:[UILabel:0x7a8724b0'Name']-(NSSpace(8))-[UITextField:0x7a88cff0]>",
"<NSLayoutConstraint:0x7a87b2e0 UITextField:0x7a88cff0.trailing == UIView:0x7a887ee0.trailingMargin>",
"<NSLayoutConstraint:0x7ac7c430 'UIView-Encapsulated-Layout-Width' H:[UIView:0x7a887ee0(320)]>"
)
Will attempt to recover by breaking constraint
<NSLayoutConstraint:0x7a87b000 H:[UILabel:0x7a8724b0'Name'(>=400)]>
Make a symbolic breakpoint at UIViewAlertForUnsatisfiableConstraints to catch this in the debugger.
The methods in the UIConstraintBasedLayoutDebugging category on UIView listed in <UIKit/UIView.h> may also be helpful.
Swift
복사
뷰의 자동 크기 조정 마스크를 기반으로하는 제약 조건 (예 : translatesAutoresizingMaskIntoConstraints가 YES 일 때 생성 된 제약 조건)에는 마스크에 대한 추가 정보가 있습니다. 제약 조건의 주소 뒤에 로그 문자열은 h = 뒤에 3 개 문자가, v = 뒤에 3자가 표시됩니다. -(하이픈) 문자는 고정 값을 나타내고 & (앰퍼샌드)는 유연한 값을 나타냅니다. 가로 마스크 (h =)의 경우 세 문자는 왼쪽 여백, 너비 및 오른쪽 여백을 나타냅니다. 세로 마스크 (v =)의 경우 위쪽 여백, 높이 및 아래쪽 여백을 나타냅니다.
<NSAutoresizingMaskLayoutConstraint:0x7ff28252e480 h=--& v=--& H:[UIView:0x7ff282617cc0(50)]>"
Swift
복사
NSAutoresizingMaskLayoutConstraint : 0x7ff28252e480 : 제약의 클래스 및 주소. 이 예에서 클래스는 뷰의 자동 크기 조정 마스크를 기반으로한다고 알려줍니다.
h =-& v = — & : 뷰의 자동 크기 조정 마스크입니다. 이것이 기본 마스크입니다. 수평으로 고정 된 왼쪽 여백, 고정 된 너비 및 유연한 오른쪽 여백이 있습니다. 수직으로 고정 된 상단 여백, 고정 된 높이 및 유연한 하단 여백이 있습니다. 즉, 뷰의 왼쪽 상단 모서리와 크기는 수퍼 뷰의 크기가 변경 되어도 일정하게 유지됩니다.
H : [UIView : 0x7ff282617cc0 (50)] : 제약 조건의 시각적 형식 언어 설명입니다. 이 예에서는 일정한 너비가 50 포인트 인 단일 뷰를 정의합니다. 이 설명에는 제약 조건의 영향을받는 뷰의 클래스와 주소도 포함됩니다.
뷰에 명백한 텍스트 구성 요소가있는 경우 Xcode는이를 식별자로 사용합니다. 예를 들어 Xcode는 레이블의 텍스트, 단추의 제목 또는 텍스트 필드의 자리 표시자를 사용하여 이러한보기를 식별합니다. 그렇지 않으면 Identity inspector에서보기의 Xcode 특정 레이블을 설정하십시오. Interface Builder는 인터페이스 전체에서 이러한 식별자를 사용합니다. 이들 중 다수는 콘솔 로그에도 표시됩니다.
// Don’t do this! Removes and re-adds constraints potentially at 120 frames per second
override func updateConstraints() {
NSLayoutConstraint.deactivate(myConstraints)
myConstraints.removeAll()
let views = ["text1":text1, "text2":text2]
myConstraints+=NSLayoutConstraint.constraints(withVisualFormat: "H:|-[text1]-[text2]",
options: [.alignAllFirstBaseline],
metrics: nil,
views: views)
myConstraints+=NSLayoutConstraint.constraints(withVisualFormat: "V:|-[text1]-|",
options: [],
metrics: nil,
views: views)
NSLayoutConstraint.activate(myConstraints)
super.updateConstraints()
}
Swift
복사
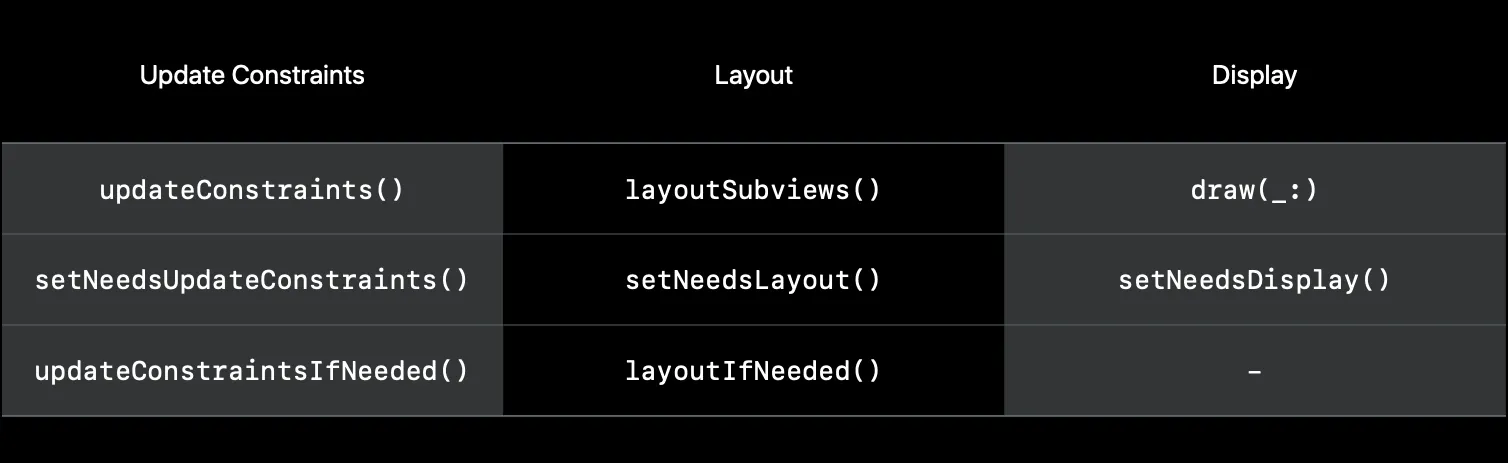
UpdateConstraints는 초당 120번 프레임을 수정하게 될 가능성이 있습니다.
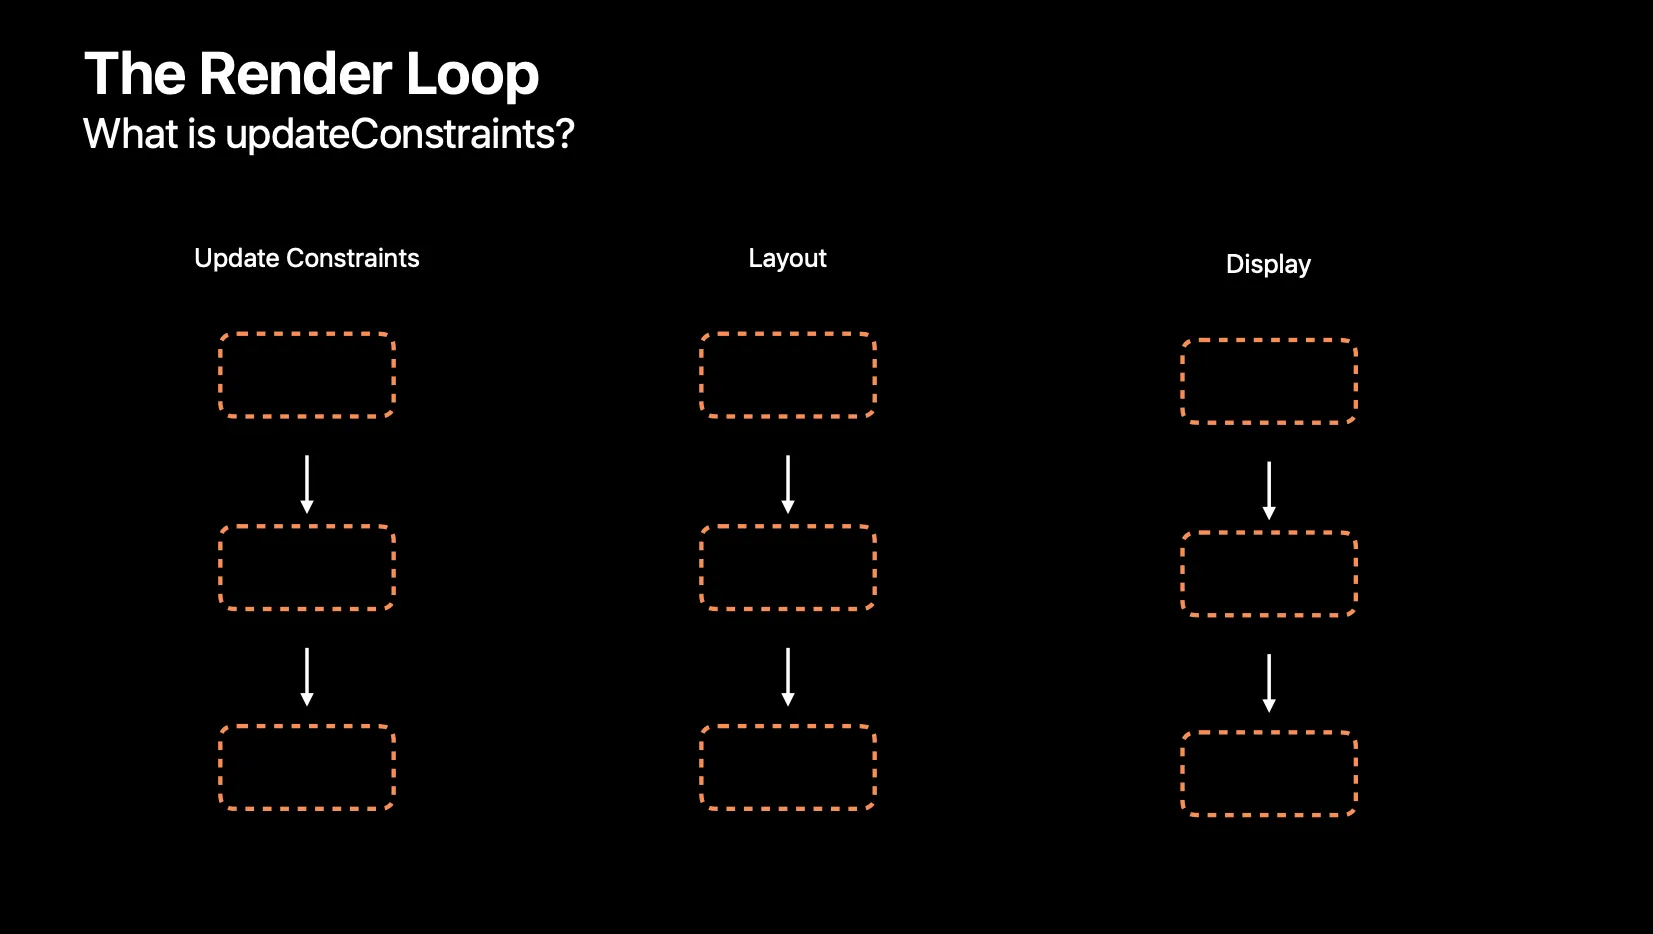
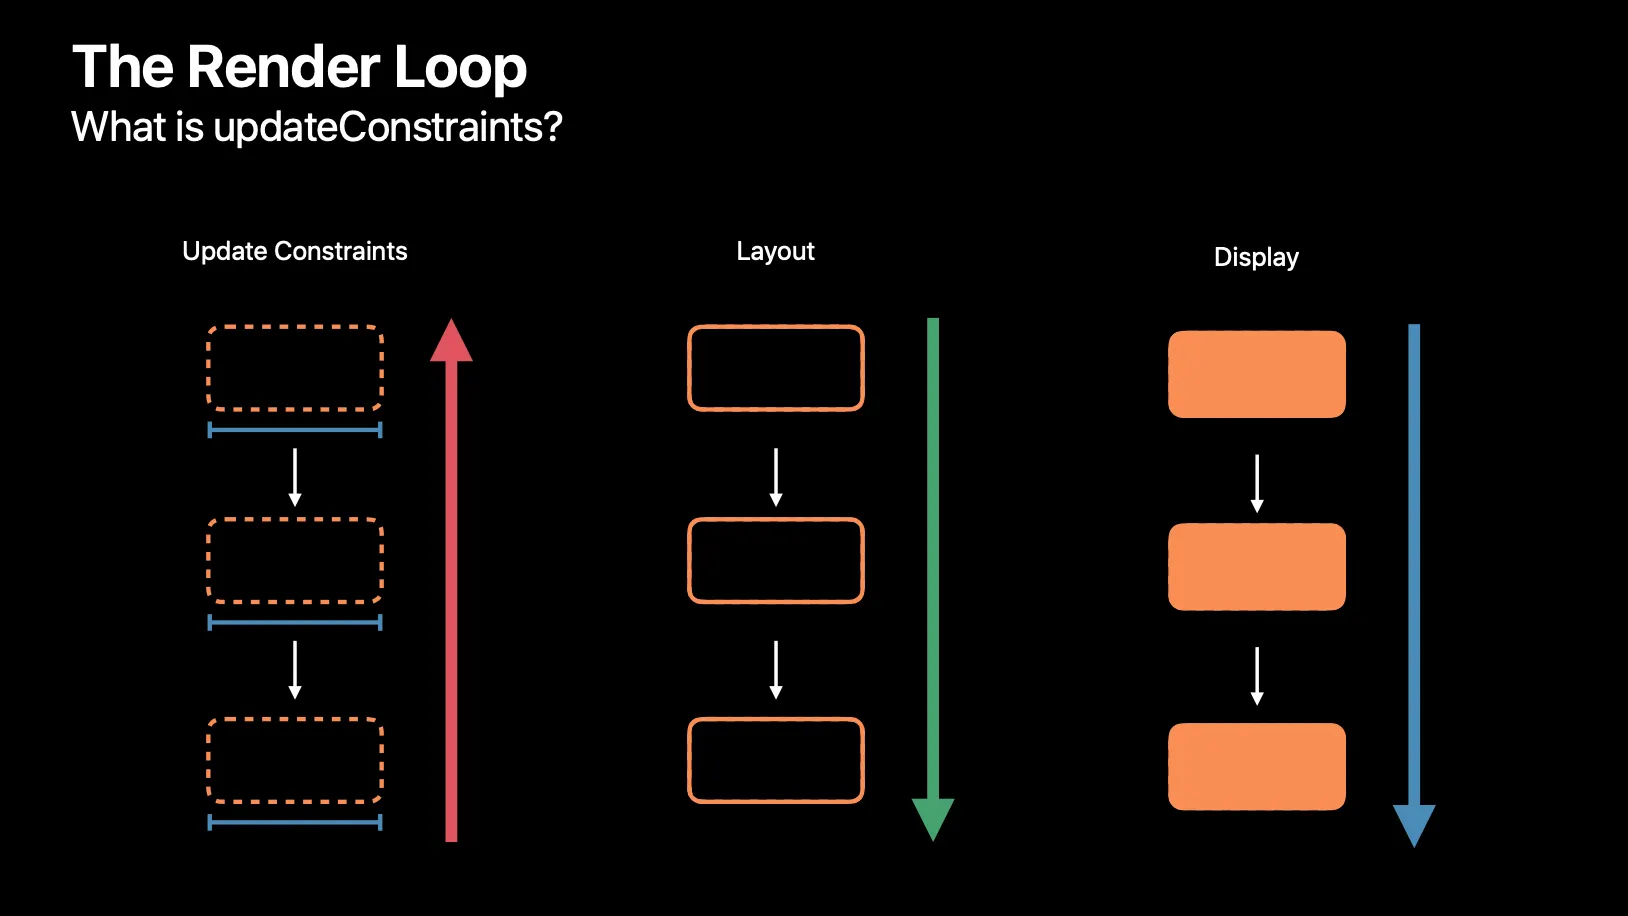
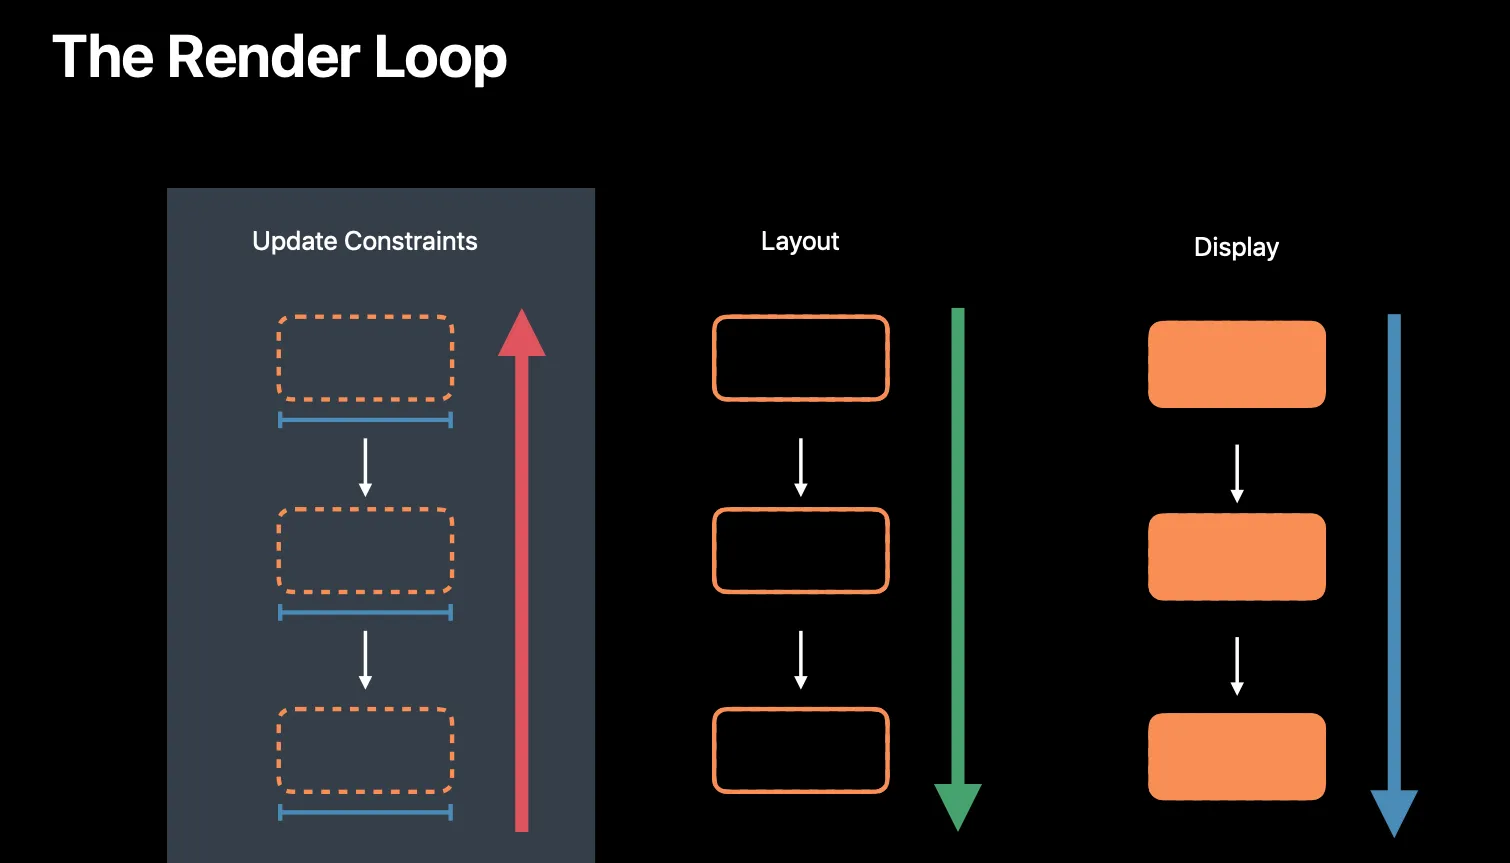
updateConstraints는 렌더루프의 종류중 하나이다.
렌더 루프는 프로세스이며 초당 120번 돌 가능성이 있으며
각각 컨텐츠들이 제 프레임을 찾을수 있도록 한다.
모든 뷰들은 업데이트 컨스트레인트를 리시브합니다. 그리고 맨 아래에서부터 뷰 하이라이키 위쪽으로 윈도우까지 올라갑니다.
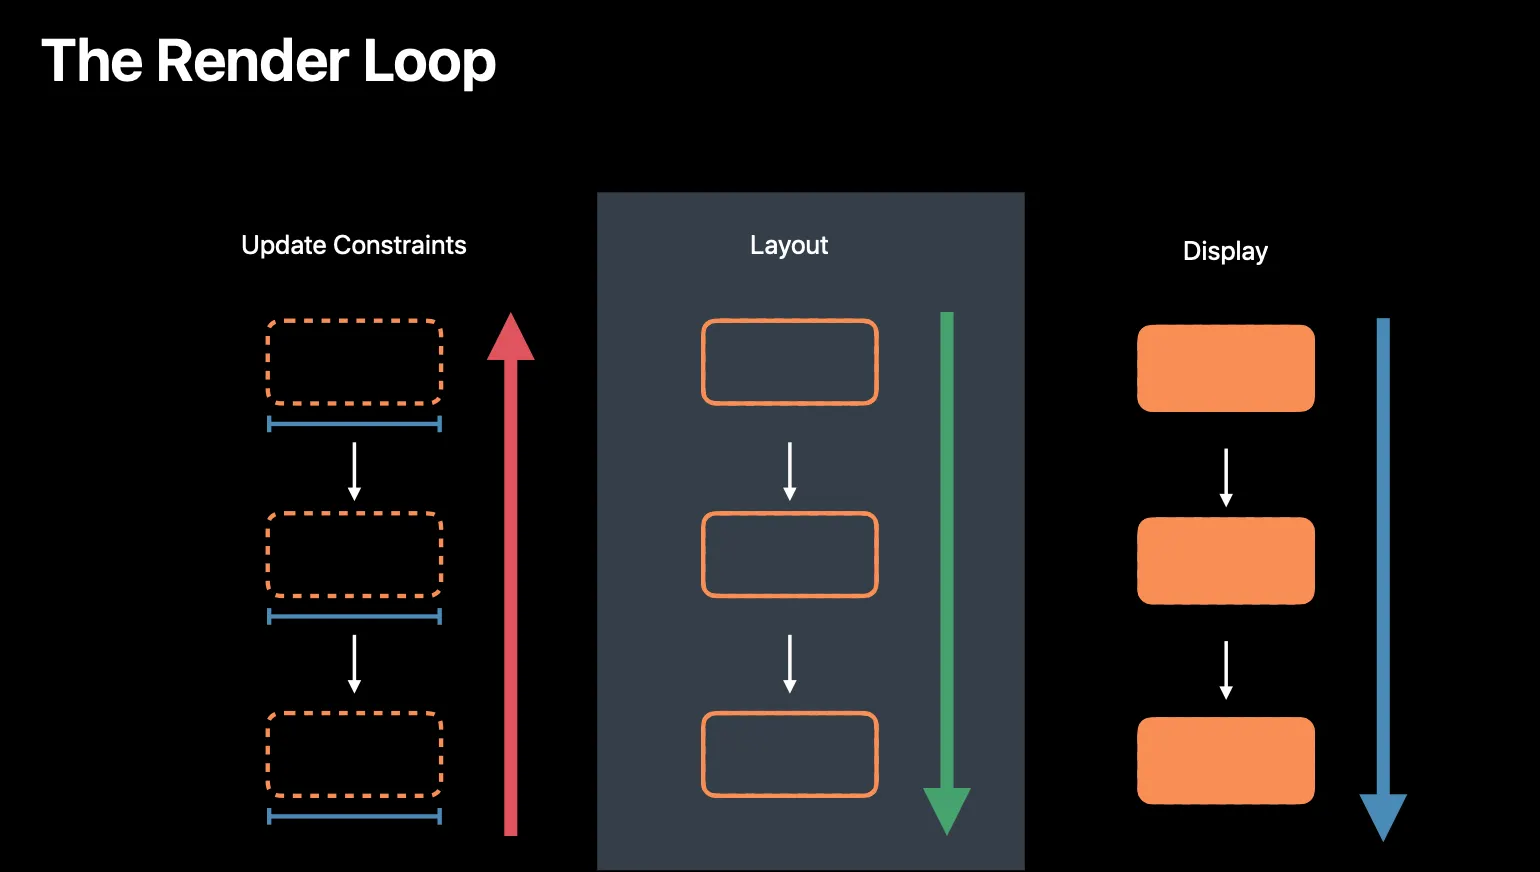
모든 뷰들은 레이아웃 서브뷰를 리시브 합니다.
순서는 윈도우에서 시작해서 맨 하단으로 들어가게 됩니다.
그다음에 뷰 화면을 그립니다.
비슷한 이런 친구들도 있는데 얘네는 왜 존재하는걸까요?
성능때문입니다.
예를 들어 레이블이 있습니다.
하지만 많은 프로퍼티들이 사이즈에 관여합니다.
폰트 텍스트 사이즈
첫번째 방법은 각 속성들이 불릴때마다 사이즈를 계산하는 것입니다. 비효율적이다.
중간은 다 낭비기에 마지막에만 측정하고 싶을것이다.
렌더루프가 합니다.
setneedsupdateConstraints만 호출하면 할수있다.
그리고 120번 호출되는 현상이 있다.
// Don’t do this! Removes and re-adds constraints potentially at 120 frames per second
override func layoutSubviews() {
text1.removeFromSuperview()
text1 = nil
text1 = UILabel(frame: CGRect(x: 20, y: 20, width: 300, height: 30))
self.addSubview(text1)
text2.removeFromSuperview()
text2 = nil
text2 = UILabel(frame: CGRect(x: 340, y: 20, width: 300, height: 30))
self.addSubview(text2)
super.layoutSubviews()
}
Swift
복사
// This is ok! Doesn’t do anything unless self.myConstraints has been nil’d out
override func updateConstraints() {
if self.myConstraints == nil {
var constraints = [NSLayoutConstraint]()
let views = ["text1":text1, "text2":text2]
constraints += NSLayoutConstraint.constraints(withVisualFormat: "H:|-[text1]-[text2]",options: [.alignAllFirstBaseline], metrics: nil, views: views)
constraints += NSLayoutConstraint.constraints(withVisualFormat: "V:|-[text1]-|", options: [], metrics: nil, views: views)}
NSLayoutConstraint.activate(constraints)
self.myConstraints = constraints
}
super.updateConstraints()
}
Swift
복사
렌더 루프는 좋다. 불필요한 계산을 피하게 해준다.
하지만 너무 자주 불린다.
가장좋은것은 인터페이스 빌더를 이용하는것입니다.

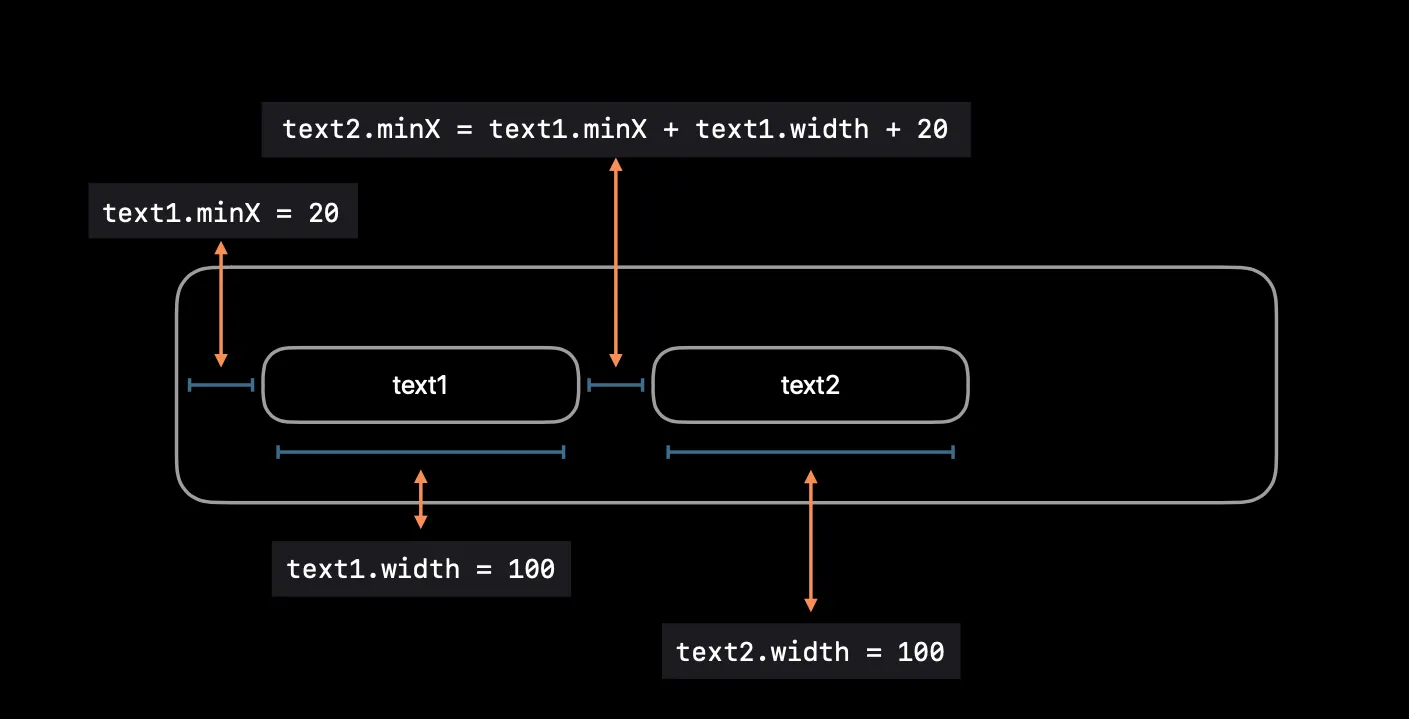
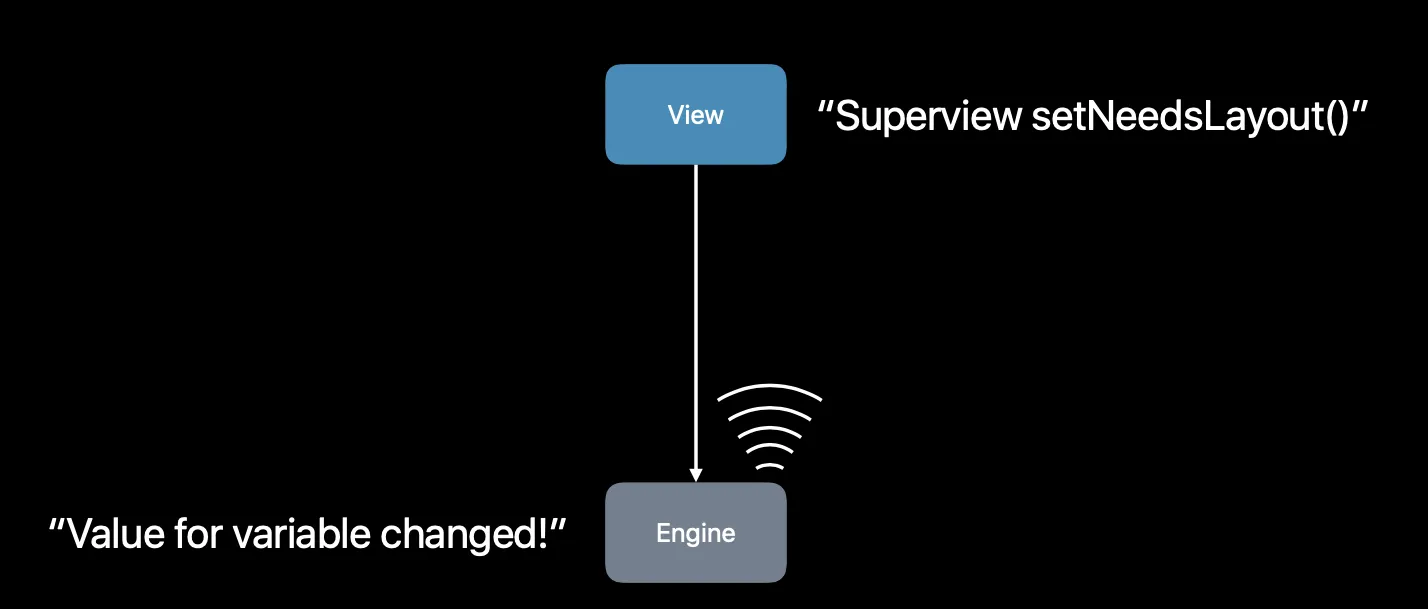
엔진은 오토레이아웃 코어 입니다.
뷰에 제약조건이 추가되면 그에 관한 방정식을 만들고 관련된 변수를 만들게 됩니다.
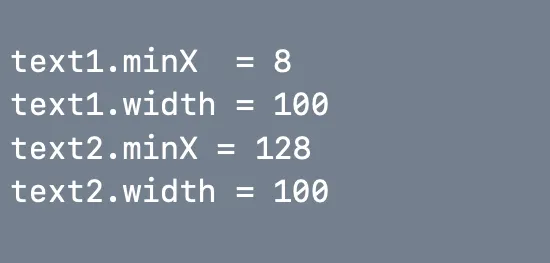
프레임와 관련된 x를 구하는 식을 만들게 되는데

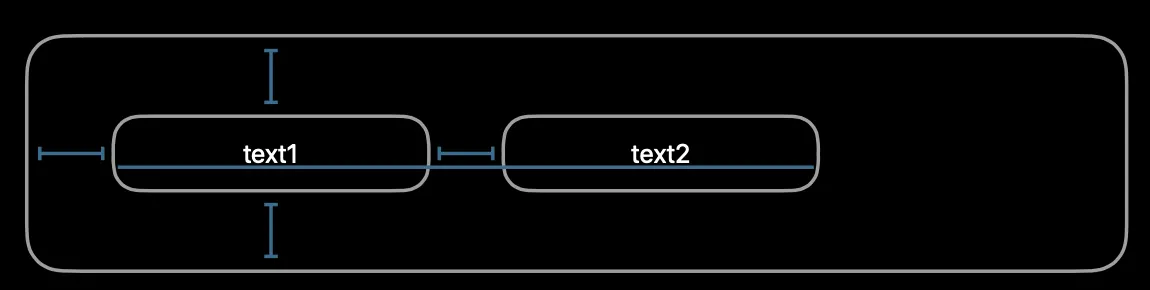
위 4가지들입니다
아까 잡은 레이아웃입니다.
위아래의 제약조건은 일단 무시하겠습니다.
이내용들을 알고있다면 성능에 대해서 자연스래 고려하게 될것입니다.
Optionally override for text measurement
Return size if known without text measurement Use UIView.noIntrinsicMetric and constraints
이미 레이블의 사이즈를 아는경우
•
override var intrinsicContentSize: CGSize { return. CGSize(width: UIView.noIntrinsicMetric, height.: UIView.noIntrinsicMetric)
}
•
호출 가능한 한 적게 해야한다.
•
엔진이 생성되고 프레임을 반환한뒤 엔진이 해제된다
•
systemLayoutSizeFitting(_:)
preferredMaxLayoutWidth
- (void)layoutSubviews
{
[super layoutSubviews];
myLabel.preferredMaxLayoutWidth = myLabel.frame.size.width;
[super layoutSubviews];
}
@implementation MyLabel
- (void)layoutSubviews
{
self.preferredMaxLayoutWidth = self.frame.size.width;
[super layoutSubviews];
}
Swift
복사
(void)layoutSubviews
{
[super layoutSubviews];
myLabel.preferredMaxLayoutWidth = myLabel.frame.size.width;
[super layoutSubviews];
}
Swift
복사
레이블이 프레임 세트를 가져 오려면 [super layoutSubviews]에 대한 첫 번째 호출이 필요하고 변경 후 레이아웃을 업데이트하려면 두 번째 호출이 필요합니다. 두 번째 호출을 생략하면 제약 조건을 업데이트해야하는 레이아웃 패스를 변경했지만 레이아웃을 다시 트리거하지 않았기 때문에 NSInternalInconsistencyException 오류가 발생합니다.
레이블 하위 클래스 자체에서도이 작업을 수행 할 수 있습니다.
[UIView animateWithDuration:1 animations:^{
myView.frame = newFrame;
}];
// update constraints
[UIView animateWithDuration:1 animations:^{
[myView layoutIfNeeded];
}];
[UIView animateWithDuration:1 animations:^{
myView.transform = CGAffineTransformMakeScale(.5, .5);
}];
Swift
복사
일반적으로 중앙 점을 유지하면서 뷰의 크기를 절반으로 조정합니다. 그러나 자동 레이아웃의 동작은 뷰를 배치하기 위해 설정 한 제약의 종류에 따라 다릅니다. 수퍼 뷰 내에서 중앙에 배치하면 변환을 적용하면 수퍼 뷰 내에서 새 프레임을 중앙에 배치하는 레이아웃 패스가 트리거되기 때문에 결과는 예상대로입니다. 그러나 뷰의 왼쪽 가장자리를 다른 뷰에 정렬 한 경우이 정렬이 유지되고 중심점이 이동합니다.
어쨌든 제약이있는 뷰에 이와 같은 변환을 적용하는 것은 결과가 처음에 우리의 기대와 일치하더라도 좋은 생각이 아닙니다. 뷰의 프레임이 제약 조건과 동기화되지 않아 길을 따라 이상한 동작이 발생합니다.
Baseline Alignment
To enable constraints using the NSLayoutAttributeBaseline attribute to work on a custom view, we have to do a little bit of extra work. Of course this only makes sense if the custom view in question has something like a baseline.
On iOS, baseline alignment can be enabled by implementing viewForBaselineLayout. The bottom edge of the view you return here will be used as baseline. The default implementation simply returns self, while a custom implementation can return any subview. On OS X you don’t return a subview but an offset from the view’s bottom edge by overriding baselineOffsetFromBottom, which has the same default behavior as its iOS counterpart by returning 0 in its default implementation.